Automated Cyber Range Deployments with Ludus and Claude, Part 1: Building a Range You Can Watch
Status: Running draft, written as I went. Part 1 builds the range and makes it observable. Part 2 adds the SIEM and covers what the review afterwards turned up.
Why I’m writing this
Standing up a realistic cyber range is usually an afternoon of clicking through Proxmox, hand-writing Ansible, and squinting at firewall rules. I wanted to see how far I could get by describing the range I wanted to Claude Code, wired up to Ludus through its MCP server, and letting it author the config, build the provisioning roles, deploy, and verify the whole thing end to end.
This post is the running log of that experiment: what I asked for, what Claude did, where it made good calls, and the technical detours along the way.
Part 1 covers standing the range up and making it observable: installing Ludus, going from a paragraph of description to a deployed and segmented range, tapping its traffic without changing what the VMs see, and giving that tap something worth capturing. Part 2 puts a SIEM in front of the analysts, then works through what a proper review of the whole thing turned up, including a version pin that caused the exact problem it was meant to prevent.
Entry 0 - Install Ludus
I have a Dell PowerEdge R820 (4x E5-4650, 32 cores, 512 GB RAM, H710, 8x 1 TB EVO SSD) that had been running VMware ESXi. Given the complexity and expense of VMware these days, I was already thinking about turning it into another Proxmox server. Dedicating it to Ludus was an easy decision.
I downloaded the Debian 13 (trixie) ISO and installed it on the server. I used the graphical installer, but installed only the base server packages and no GNOME desktop. The Dell has a hardware RAID5, so I used that as the entire OS disk with LVM.
Once Debian was installed, I installed Ludus. The install instructions on the Ludus website were very good, and I didn’t have much trouble. Lessons learned:
- When you install Ludus, you have to create or choose a username other than the Debian username.
- When prompted, enter the username first and then the email. Putting an email in the first field causes issues.
- The “admin” API key is distinct from the root API key. Most of what you do in Ludus uses the former.
- Ludus has excellent remote-access support. WireGuard is built in, even in the community edition, and Ludus gives you the exact WireGuard config to install on your dev laptop or bastion. Take the time to set this up.
- Once you are connected over the VPN, you can run the Ludus tools on your laptop or bastion to control the Ludus server remotely. This matters because we don’t necessarily want to run Claude on the Ludus server; we want Claude to drive it remotely (more on this below).
My VPN Setup
Here’s what I did for the VPN.
First, install WireGuard using the instructions on the website. If you already have it with other configs or peers set up, that’s fine.
On the Ludus host, set LUDUS_API_KEY and ask the CLI for that user’s VPN client config.
I use read -s so the key is typed at a silent prompt and never lands in shell history:
1
2
$ read -rs LUDUS_API_KEY && export LUDUS_API_KEY
$ ludus user wireguard | tee ludus.conf
It prints:
1
2
3
4
5
6
7
8
9
[Interface]
PrivateKey = <WG_PRIVATE_KEY>
Address = 198.51.100.2/32

[Peer]
PublicKey = qD4/ZCoUehkZ88QthZTF1pz/E25wIWI/d1aoyBOwiSE=
Endpoint = 172.31.1.100:51820
AllowedIPs = 198.51.100.1/32,10.1.0.0/16
PersistentKeepalive = 25
Copy this to the clipboard.
Then, on my dev laptop:
1
2
3
4
5
6
sudo -s
cd /etc/wireguard
vim wg-ludus.conf
<PASTE IN THE CONFIG Ludus gave you and save the file>
exit
sudo wg-quick up wg-ludus
It should show:
1
2
3
4
5
6
[#] ip link add wg-ludus type wireguard
[#] wg setconf wg-ludus /dev/fd/63
[#] ip -4 address add 198.51.100.2/32 dev wg-ludus
[#] ip link set mtu 1420 up dev wg-ludus
[#] ip -4 route add 198.51.100.1/32 dev wg-ludus
[#] ip -4 route add 10.1.0.0/16 dev wg-ludus
And you should get an IP on the VPN:
1
2
3
4
62: wg-ludus: <POINTOPOINT,NOARP,UP,LOWER_UP> mtu 1420 qdisc noqueue state UNKNOWN group default qlen 1000
    link/none
    inet 198.51.100.2/32 scope global wg-ludus
       valid_lft forever preferred_lft forever
To drop the VPN:
1
sudo wg-quick down wg-ludus
Entry 1 - From a sentence to a deployed range
1
2
rangeState: NEVER DEPLOYED
VMs: 0
On your dev laptop, take the time to set up the Ludus WireGuard VPN and connect.
Then install the Ludus client.
Then install the Ludus MCP server and skills.
The Ludus MCP README passes the key with --api-key, but I’d avoid that.
Anything after claude mcp add is saved in plain text in ~/.claude.json.
It also ends up in your shell history, and while the server runs, anyone on the machine can read it in ps output.
The server also reads LUDUS_URL and LUDUS_API_KEY from its environment, and Claude Code starts MCP servers with the environment of the shell that launched it.
So register the server with no secrets, and pin its version:
1
claude mcp add ludus -- npx -y @badsectorlabs/ludus-mcp@0.3.0
Without the @0.3.0, npx -y fetches and runs whatever version is newest every time Claude starts, with no confirmation.
That’s a lot of trust to give a package holding an admin API key.
Pinning means an upgrade happens only when you choose it.
Then supply both values in the shell you launch Claude from:
1
2
3
export LUDUS_URL=https://<LUDUS_HOST>:8080     # for me, https://198.51.100.1:8080
read -rs LUDUS_API_KEY && export LUDUS_API_KEY  # paste the key at the silent prompt
claude
Better still, pull the key from your password manager (for example export LUDUS_API_KEY=$(op read "op://<vault>/ludus/api-key") with the 1Password CLI), so it never sits on disk at all.
Then add the skills, which are distributed as a package that Claude will have access to.
Skills are instructions that get loaded into the agent’s context, so a skill you haven’t read is an open door for prompt injection.
I’ll be honest: the first time, I installed straight from the live URL without reading anything.
Before publishing this, I went back and did it properly.
I cloned the repo, confirmed that my installed copies are byte-for-byte identical to commit 28b2bfcf, and read all of it.
That’s four short SKILL.md files and about 1,600 lines of reference docs.
They’re clean: no hidden text, no instructions to act without asking, and nothing that sends data anywhere.
Destructive commands like ludus range rm --no-prompt show up only as CLI reference.
One thing worth knowing: the environment-guide skill points at third-party GitHub repos for pre-built labs such as GOAD.
If you let it deploy one of those, you’re trusting that repo’s Ansible too.
The way I’d install it now is to pin the commit, read the files, and install from the local copy:
1
2
3
4
git clone https://gitlab.com/badsectorlabs/ludus-skills
git -C ludus-skills checkout 28b2bfcf40f679811a0d681b52303a797e041442
# read ludus-skills/skills/*/SKILL.md and references/*.md
npx skills@1.7.0 add ./ludus-skills
- This uses the
skillsCLI, which requires npm.
What I gave Claude, and what I’d tighten
Here I have to own something: I gave Claude far more authority than this job needed.
- An admin API key.
The MCP server exposes the whole Ludus API, 105 operations, through a single
call_ludus_apitool. With an admin key, those include creating and deleting users, changing quotas, and managing every user’s ranges. - Auto-approval for that tool.
Early on, I clicked “always allow” for
call_ludus_api, so Claude Code stopped asking me before any API call. The MCP server does have a guard: DELETEs and a few other destructive operations requireconfirm: true. But the agent supplies that argument itself. With the tool auto-approved, the only thing between Claude and deleting a range was Claude deciding not to. Bash(ludus range *)on the allowlist. That pattern matchesludus range status, and it also matchesludus range rm --no-prompt.- Bypass permissions mode for some sessions. For some of the work, including the Wazuh build in Part 2, I ran Claude Code in bypass permissions mode. That turns off confirmation for every tool, shell commands included, so for those sessions the allowlist above didn’t matter at all.
Nothing went wrong, and the admin power was never used. But luck doesn’t count as a control, and a post about building a security range shouldn’t suggest otherwise. Here’s what I’d do from the start next time:
- Give Claude its own non-admin Ludus user (
ludus user addwithout--admin) with just its own range assigned. A mistake then stays inside that range, the key can be revoked on its own withludus user rm, and Ludus’s logs show which actions were the agent’s. Everything in this post touched only one range and its roles, so a scoped user should be enough; I haven’t re-run it that way yet. - Auto-approve only the read-only tools.
list_ludus_operationsanddescribe_ludus_operationare safe to auto-approve. Claude Code approves an MCP tool as a whole, with no way to approve some arguments and prompt on others, socall_ludus_apishould prompt every time. It’s a click per action, but it’s the only point where a human sees the action before it runs. And no bypass mode against anything that holds an admin key. - Allowlist specific CLI subcommands:
ludus range status,ludus range logs *,ludus range config get, and nothing that can remove anything. - Snapshot before letting the agent deploy (
ludus snapshots create pre-agent), so any change it makes can be rolled back withludus snapshots revert.
I started with nothing deployed, and a one-paragraph description of what I wanted:
A range with a DMZ connected to the internet with a webserver. Then a LAN with three analyst machines and a database VM. The webserver should serve documents/data from the database.
The topology it landed on
Claude asked two questions that actually mattered: what OS the analysts should run, and whether to auto-provision the web and database software or just stand up bare infrastructure. It then translated the answers into this:
| VM | Role | VLAN | IP |
|---|---|---|---|
admin-web01 |
Apache/PHP portal (DMZ) | 20 | 10.1.20.10 |
admin-database |
MariaDB document store (LAN) | 10 | 10.1.10.10 |
admin-soc1/2/3 |
Analyst workstations (LAN) | 10 | .21/.22/.23 |
admin-router |
Range router | - | 10.1.20.254 |
The DMZ and LAN are separate VLANs with a default-REJECT posture between them. Between range VMs, only two flows are allowed to cross the boundary:
- analysts (
.21-.23) to web01 on 80/443 - web01 to the database on 3306
Two management paths sit outside that rule on purpose, and you’ll see both in the captures below:
- The Ludus host (
192.0.2.254) reaches every VM over SSH, because that’s how Ansible provisions them. - WireGuard clients (
198.51.100.x) can reach the whole range. The client config’sAllowedIPs = 10.1.0.0/16is what lets my laptopcurlthe portal.
Those are operator paths that sit outside the scenario. If you wanted to model an outside attacker, the VPN would be the first thing to lock down.
That is the point of the scenario. The web tier is exposed, and the data lives somewhere the exposed tier can only just reach, on exactly one port.
The part I didn’t expect it to handle: provisioning
“Serve documents from the database” isn’t something a stock VM template does. It needs software and an application. None of the installed Ansible roles covered it, so Claude wrote two small custom Ludus roles and installed them on the server:
ludus_docdbinstalls MariaDB, binds it so the DMZ webserver can reach it, seeds adocumentstable with sample intel, IR, and policy documents, and creates a read-onlywebappaccount. It is least privilege by default: the web tier canSELECTand nothing else.ludus_docwebinstalls Apache and PHP, and drops in a small portal that queries the database (prepared statements, escaped output) and renders the documents.
The database host is passed to the web app as a shared global_role_vars value, so the webserver connects to the database VM by name and the two roles stay decoupled.
Deploy and verify
With the config pushed, deployRange kicked off, and six VMs were built and provisioned.
Claude started a background monitor that polled until the range reached SUCCESS.
It then checked that the application actually works:
1
2
3
4
5
6
7
$ curl -s http://10.1.20.10/
...
Documents served live from the LAN database at admin-database.
  1  Q3 Threat Intelligence Summary      CONFIDENTIAL
  2  Incident Report IR-2041             INTERNAL
  3  Third-Party Vendor Access Policy    UNCLASSIFIED
  4  Database Backup Runbook             INTERNAL
The DMZ webserver pulled all four documents live from the LAN database, across the VLAN boundary, through the single 3306 rule.
That proves the allowed path works.
To show that everything else is blocked, you have to try the paths that should fail.
The Debian template doesn’t ship nc, so these use bash’s built-in /dev/tcp:
1
2
3
4
5
6
7
8
9
10
11
12
# from admin-web01 (DMZ): anything other than 3306 into the LAN should be rejected
$ timeout 3 bash -c "</dev/tcp/10.1.10.21/22" && echo OPEN
bash: connect: Connection refused
bash: line 1: /dev/tcp/10.1.10.21/22: Connection refused
$ timeout 3 bash -c "</dev/tcp/10.1.10.10/22" && echo OPEN
bash: connect: Connection refused
bash: line 1: /dev/tcp/10.1.10.10/22: Connection refused

# from admin-soc1 (LAN): only 80/443 into the DMZ should be allowed
$ timeout 3 bash -c "</dev/tcp/10.1.20.10/22" && echo OPEN
bash: connect: Connection refused
bash: line 1: /dev/tcp/10.1.20.10/22: Connection refused
All three come back immediately with Connection refused, which is the router’s REJECT answering.
sshd is listening on every one of these VMs, and I ran these probes by SSHing into them over the VPN, so the refusal comes from the firewall.
With both the allowed and the rejected paths behaving as designed, it’s a working, segmented range, end to end, from one paragraph of description.
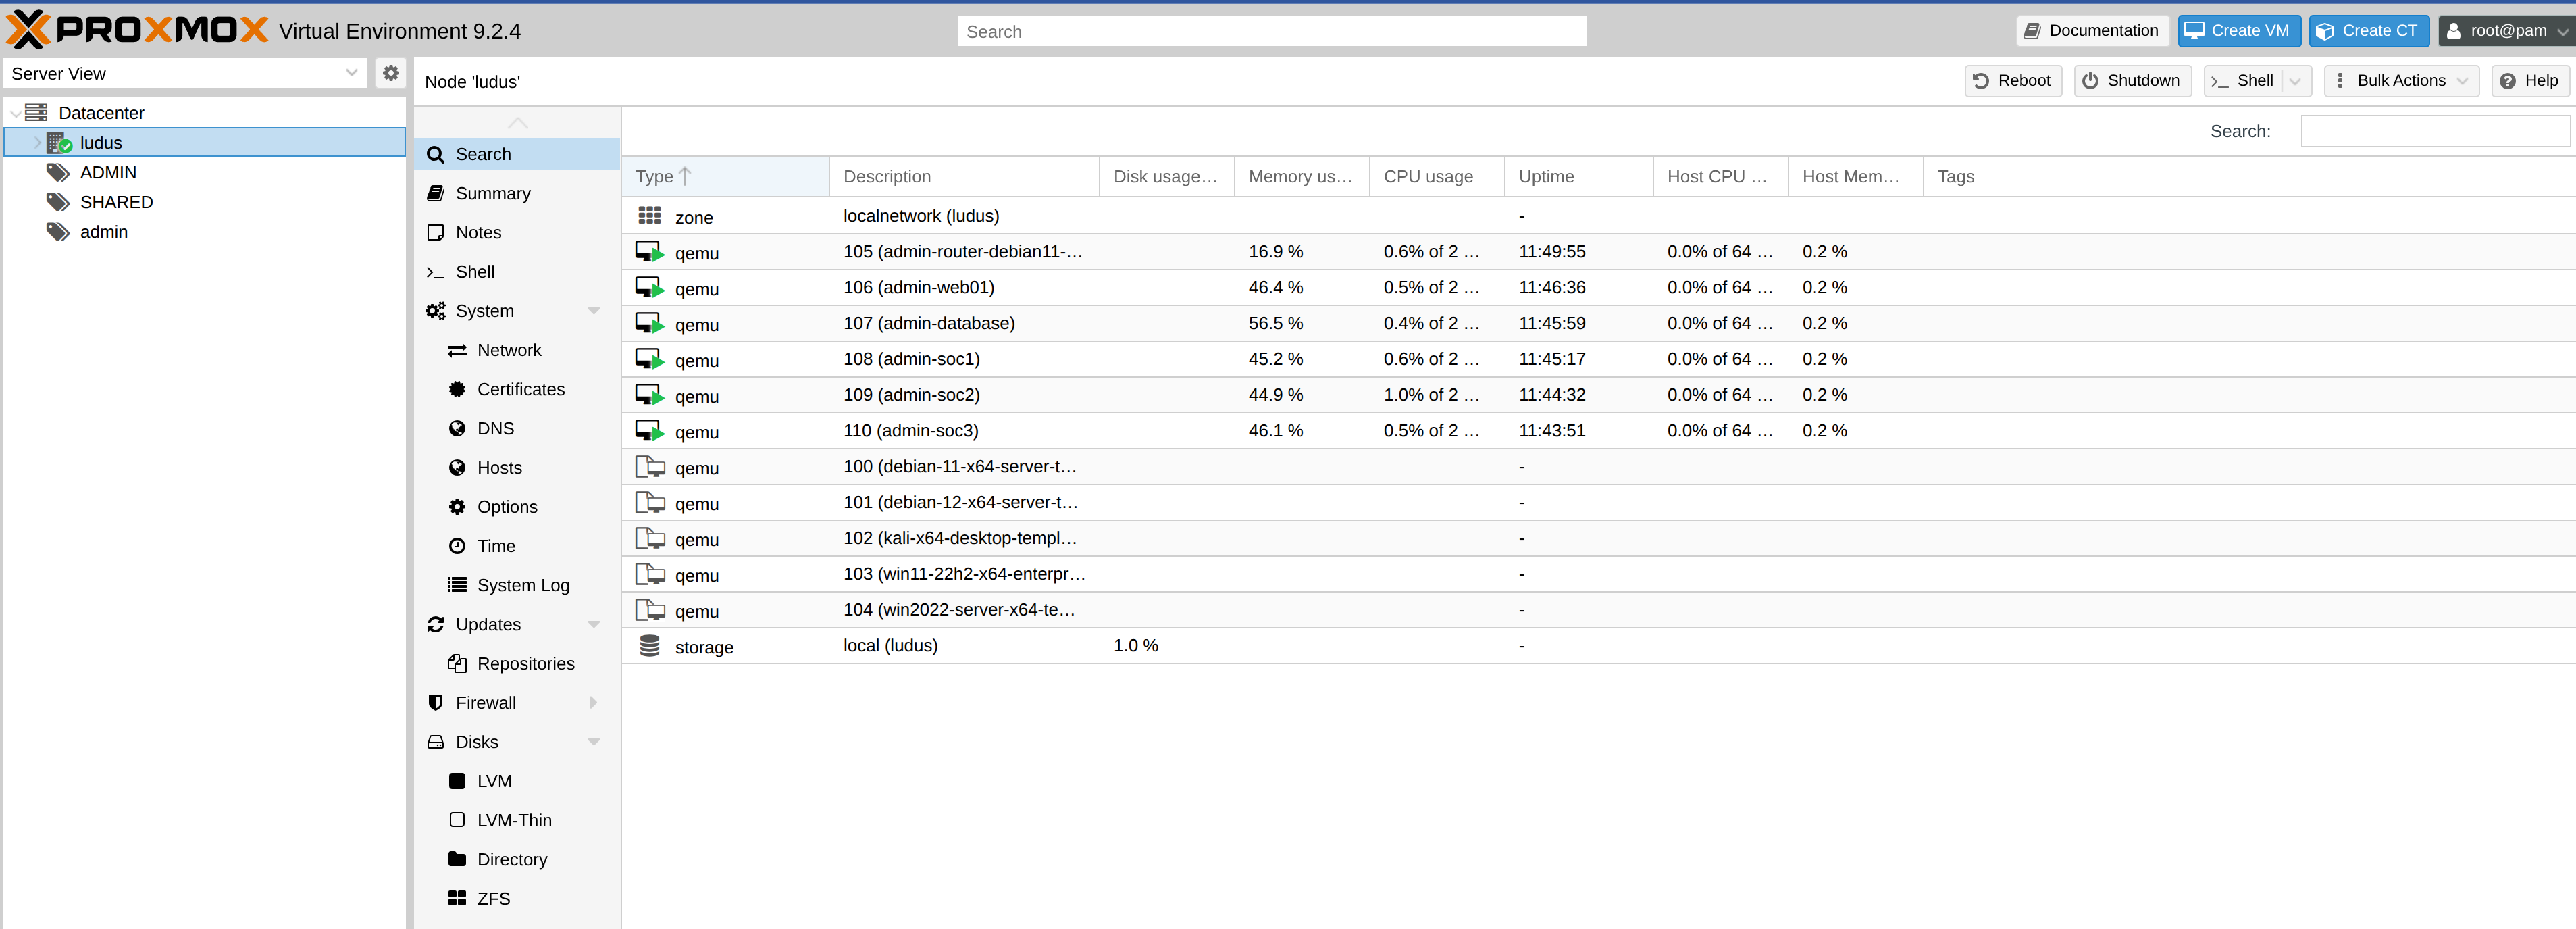
The six VMs Ludus built and booted on the Proxmox node: the router, the DMZ web01, and the LAN database plus three analyst workstations.
Entry 2 - Capturing traffic without altering it
Next I wanted packet capture on the range.
Ludus documents a method: set bridge-ageing 0 on the range bridge, which, in their words, “turns the bridge interface into a hub, where all traffic on a VLAN is sent to all machines.”
My concern was whether that would undo the segmentation I had just built, and whether it would change what the range VMs see. If I’m capturing traffic to study it, I don’t want the act of capturing to alter the traffic.
Looking into it clarified the tradeoff:
- VLAN-to-VLAN isolation survives. The bridge is VLAN-aware, and 802.1Q tags still separate broadcast domains. VLAN 20 traffic won’t leak onto VLAN 10 ports under the ageing trick.
- Within a VLAN, it contaminates. With ageing disabled, every VM on VLAN 10 suddenly sees all unicast on VLAN 10, not just its own. ARP tables, host IDS behavior, application assumptions, and noise all change: the range’s view of itself is different. For a passive study environment, that is exactly the contamination I wanted to avoid.
The cleaner approach: on a Linux bridge you don’t need the hub trick at all, because each VM’s virtual NIC is already a host-side tap interface carrying 100% of that VM’s traffic.
Capturing there is passive, and nothing in the range changes.
That gives two non-contaminating options:
tcpdumpon the host tap interfaces. This produces per-VM pcap files with no setup and is invisible to the range.- A
tcSPAN mirror (tc-mirred) to a dedicated physical NIC. This copies frames from each VM’s tap to a spare NIC for a live sensor (Zeek or Suricata) or an external capture box. The originals are untouched, so VLAN segmentation and VM behavior are intact.
I have four physical NICs on the hypervisor, so option 2 fits: one NIC is dedicated as the mirror output.
The reusable script (scripts/range-pcap.sh) discovers the range’s VMs, sets up the mirror with tc, and tears it down cleanly:
1
2
3
4
5
export CAPTURE_NIC=enp3s0            # spare NIC, no IP, not bridged
./range-pcap.sh list                 # show which VM taps will be mirrored
./range-pcap.sh start                # mirror every range tap -> enp3s0
tcpdump -i enp3s0 -w /var/pcap/range.pcap
./range-pcap.sh stop                 # clean teardown, range untouched throughout
And it works.
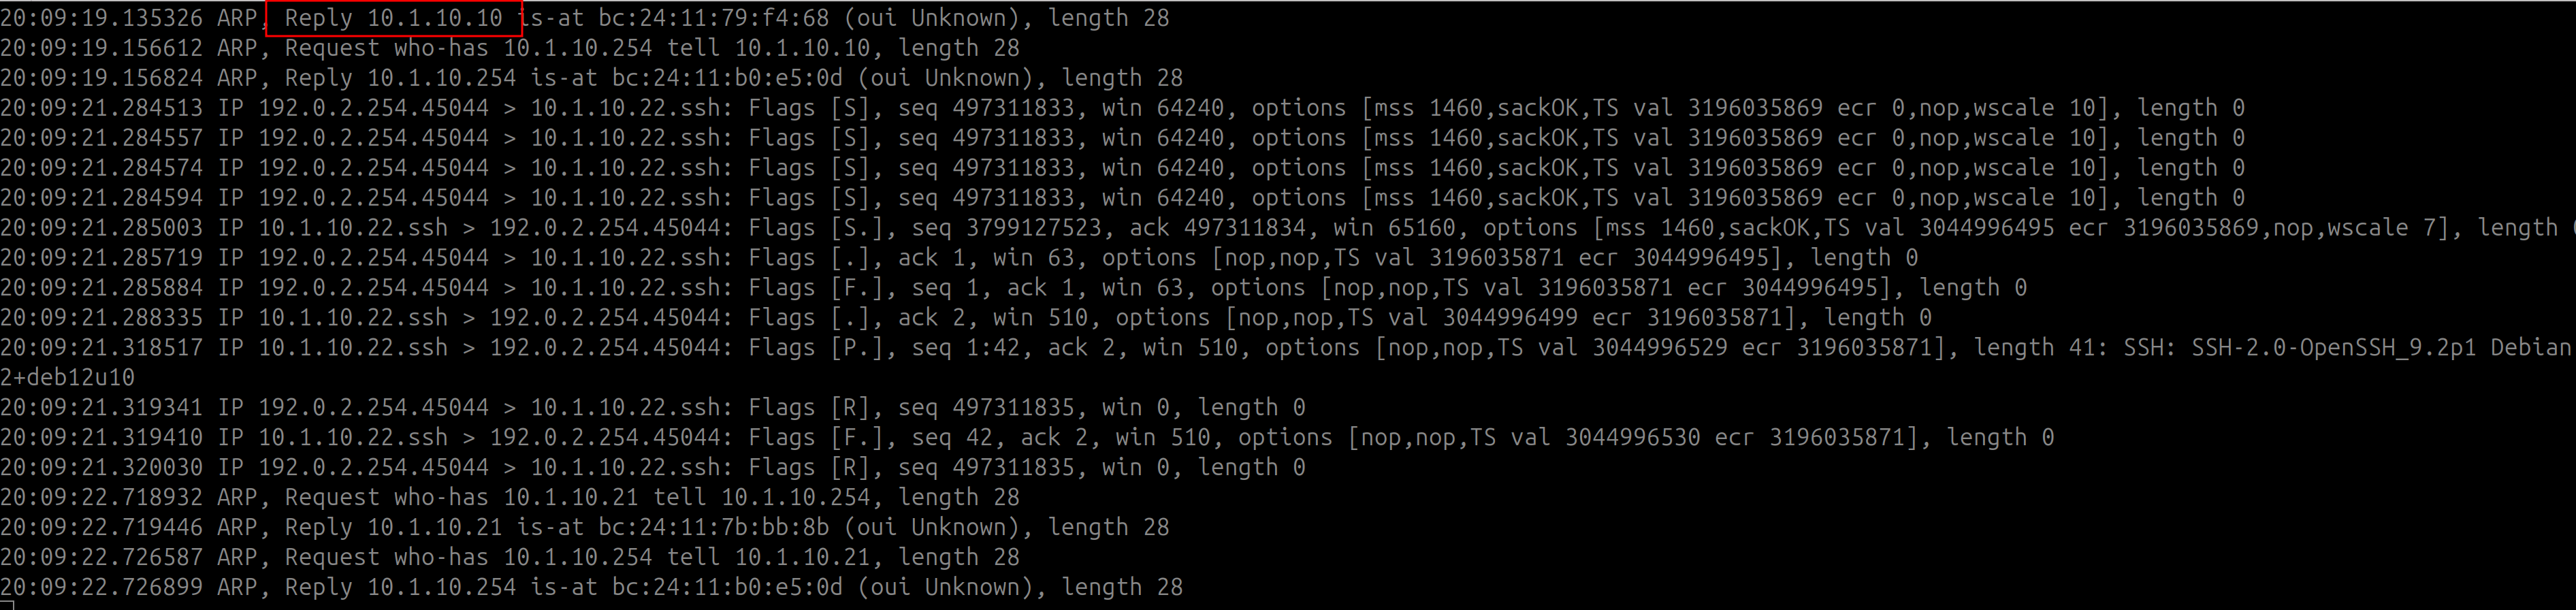
Here is raw tcpdump output from the tap: ARP resolving the LAN hosts and an SSH handshake to 10.1.10.22, captured passively without the range noticing:
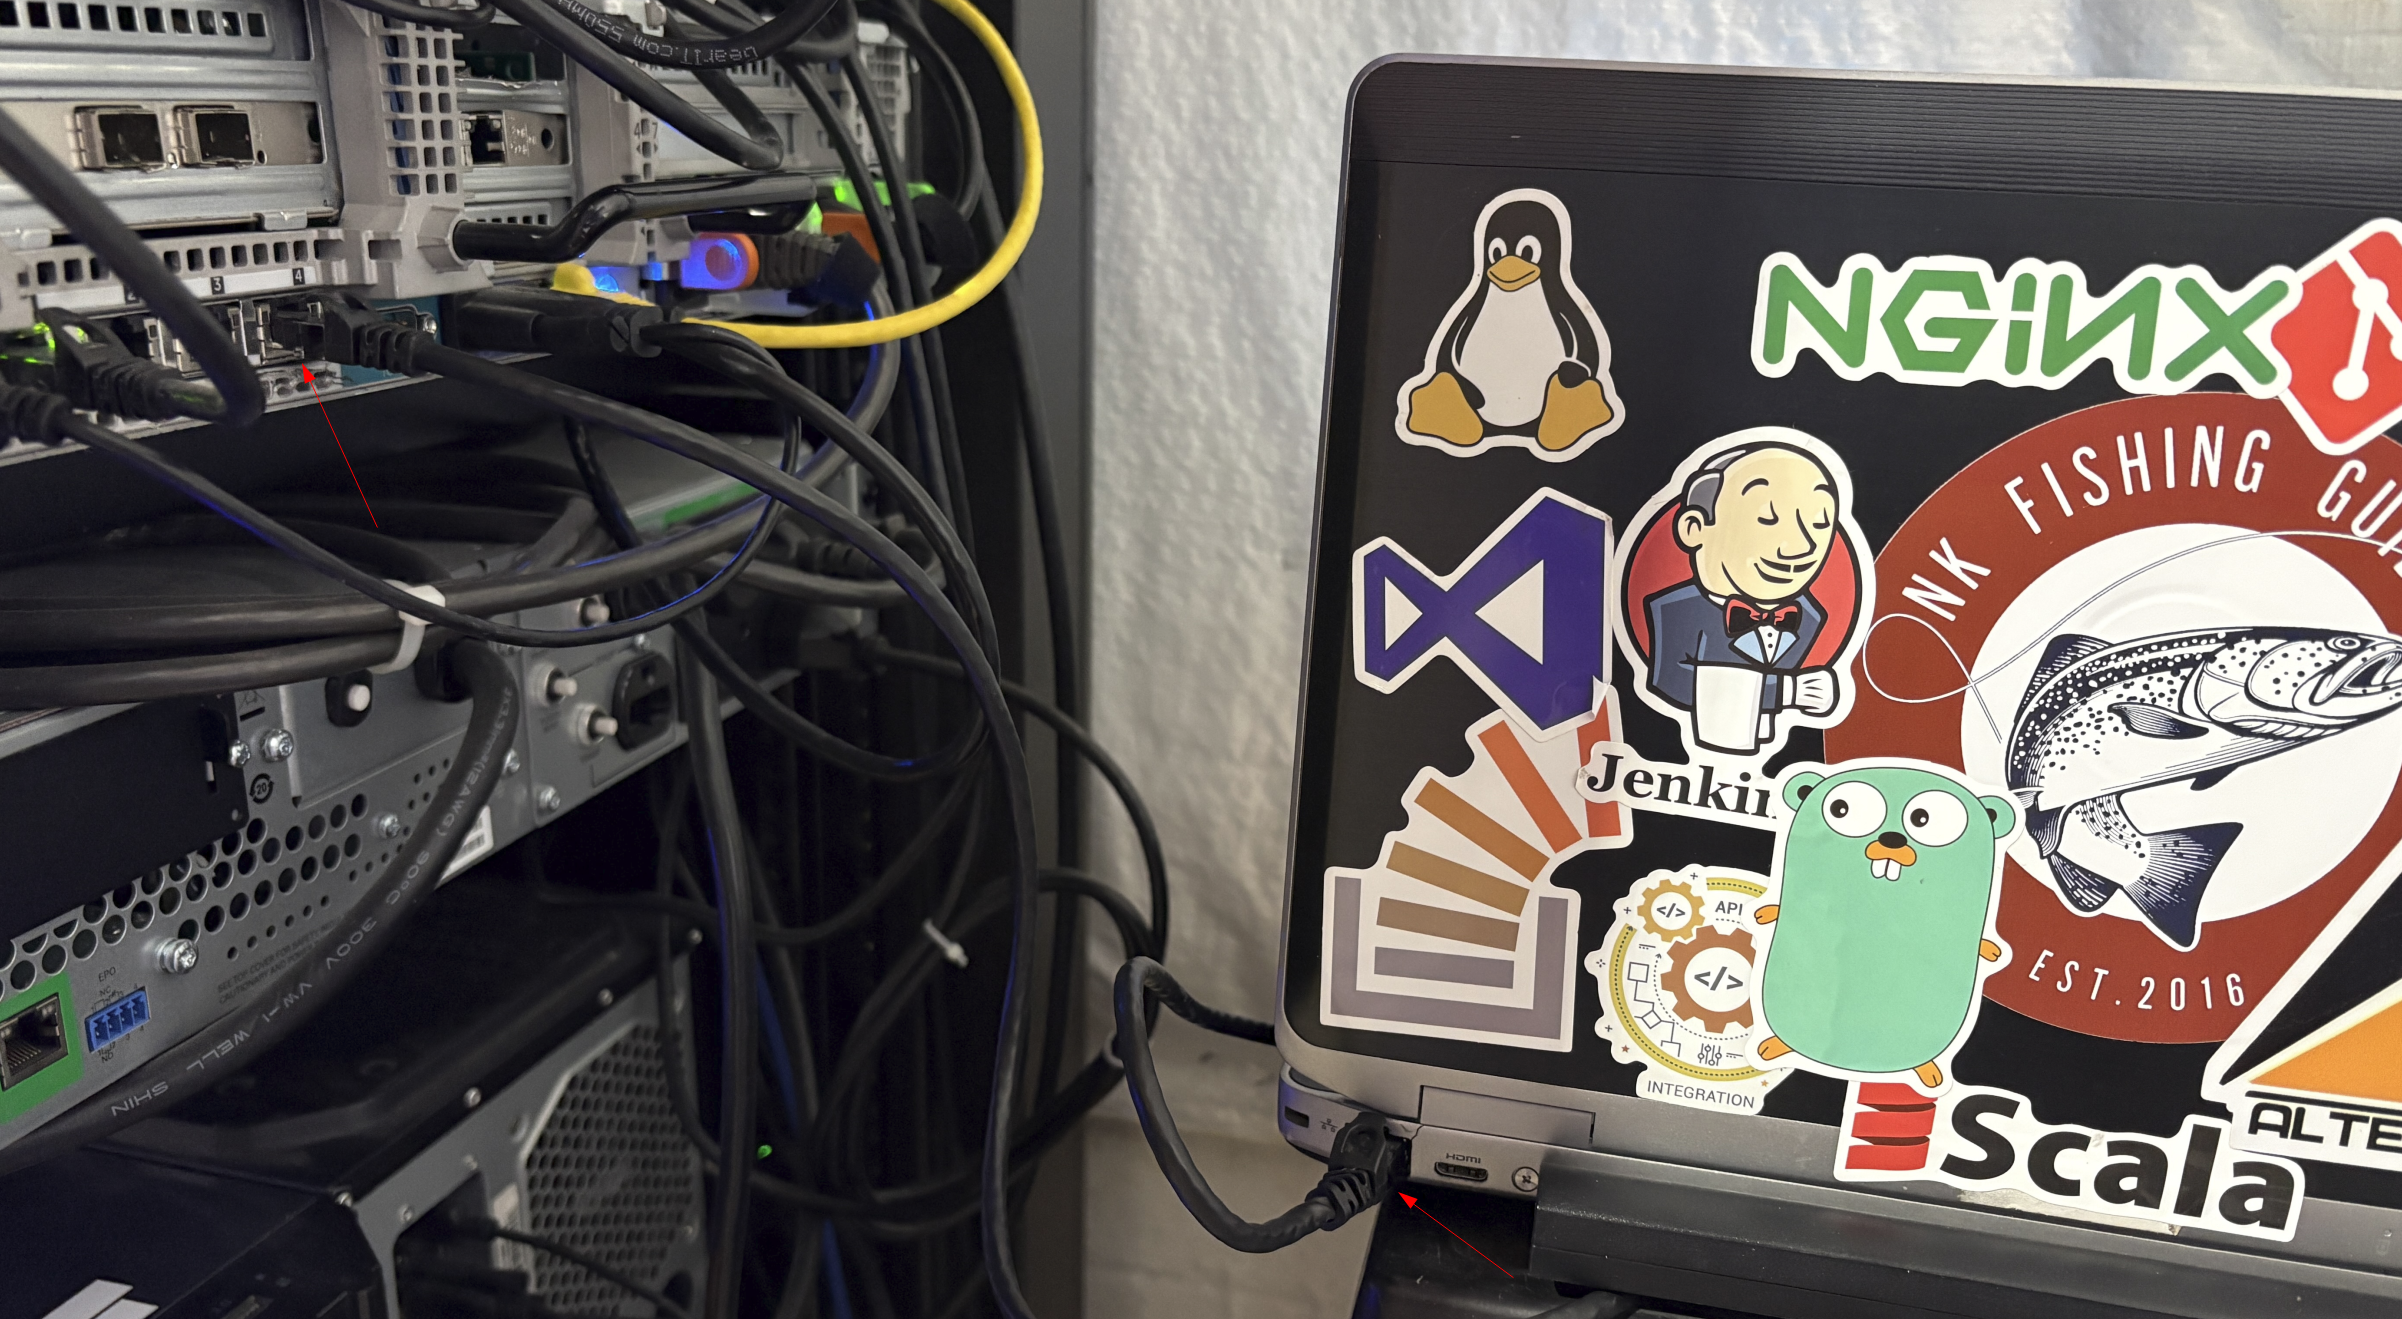
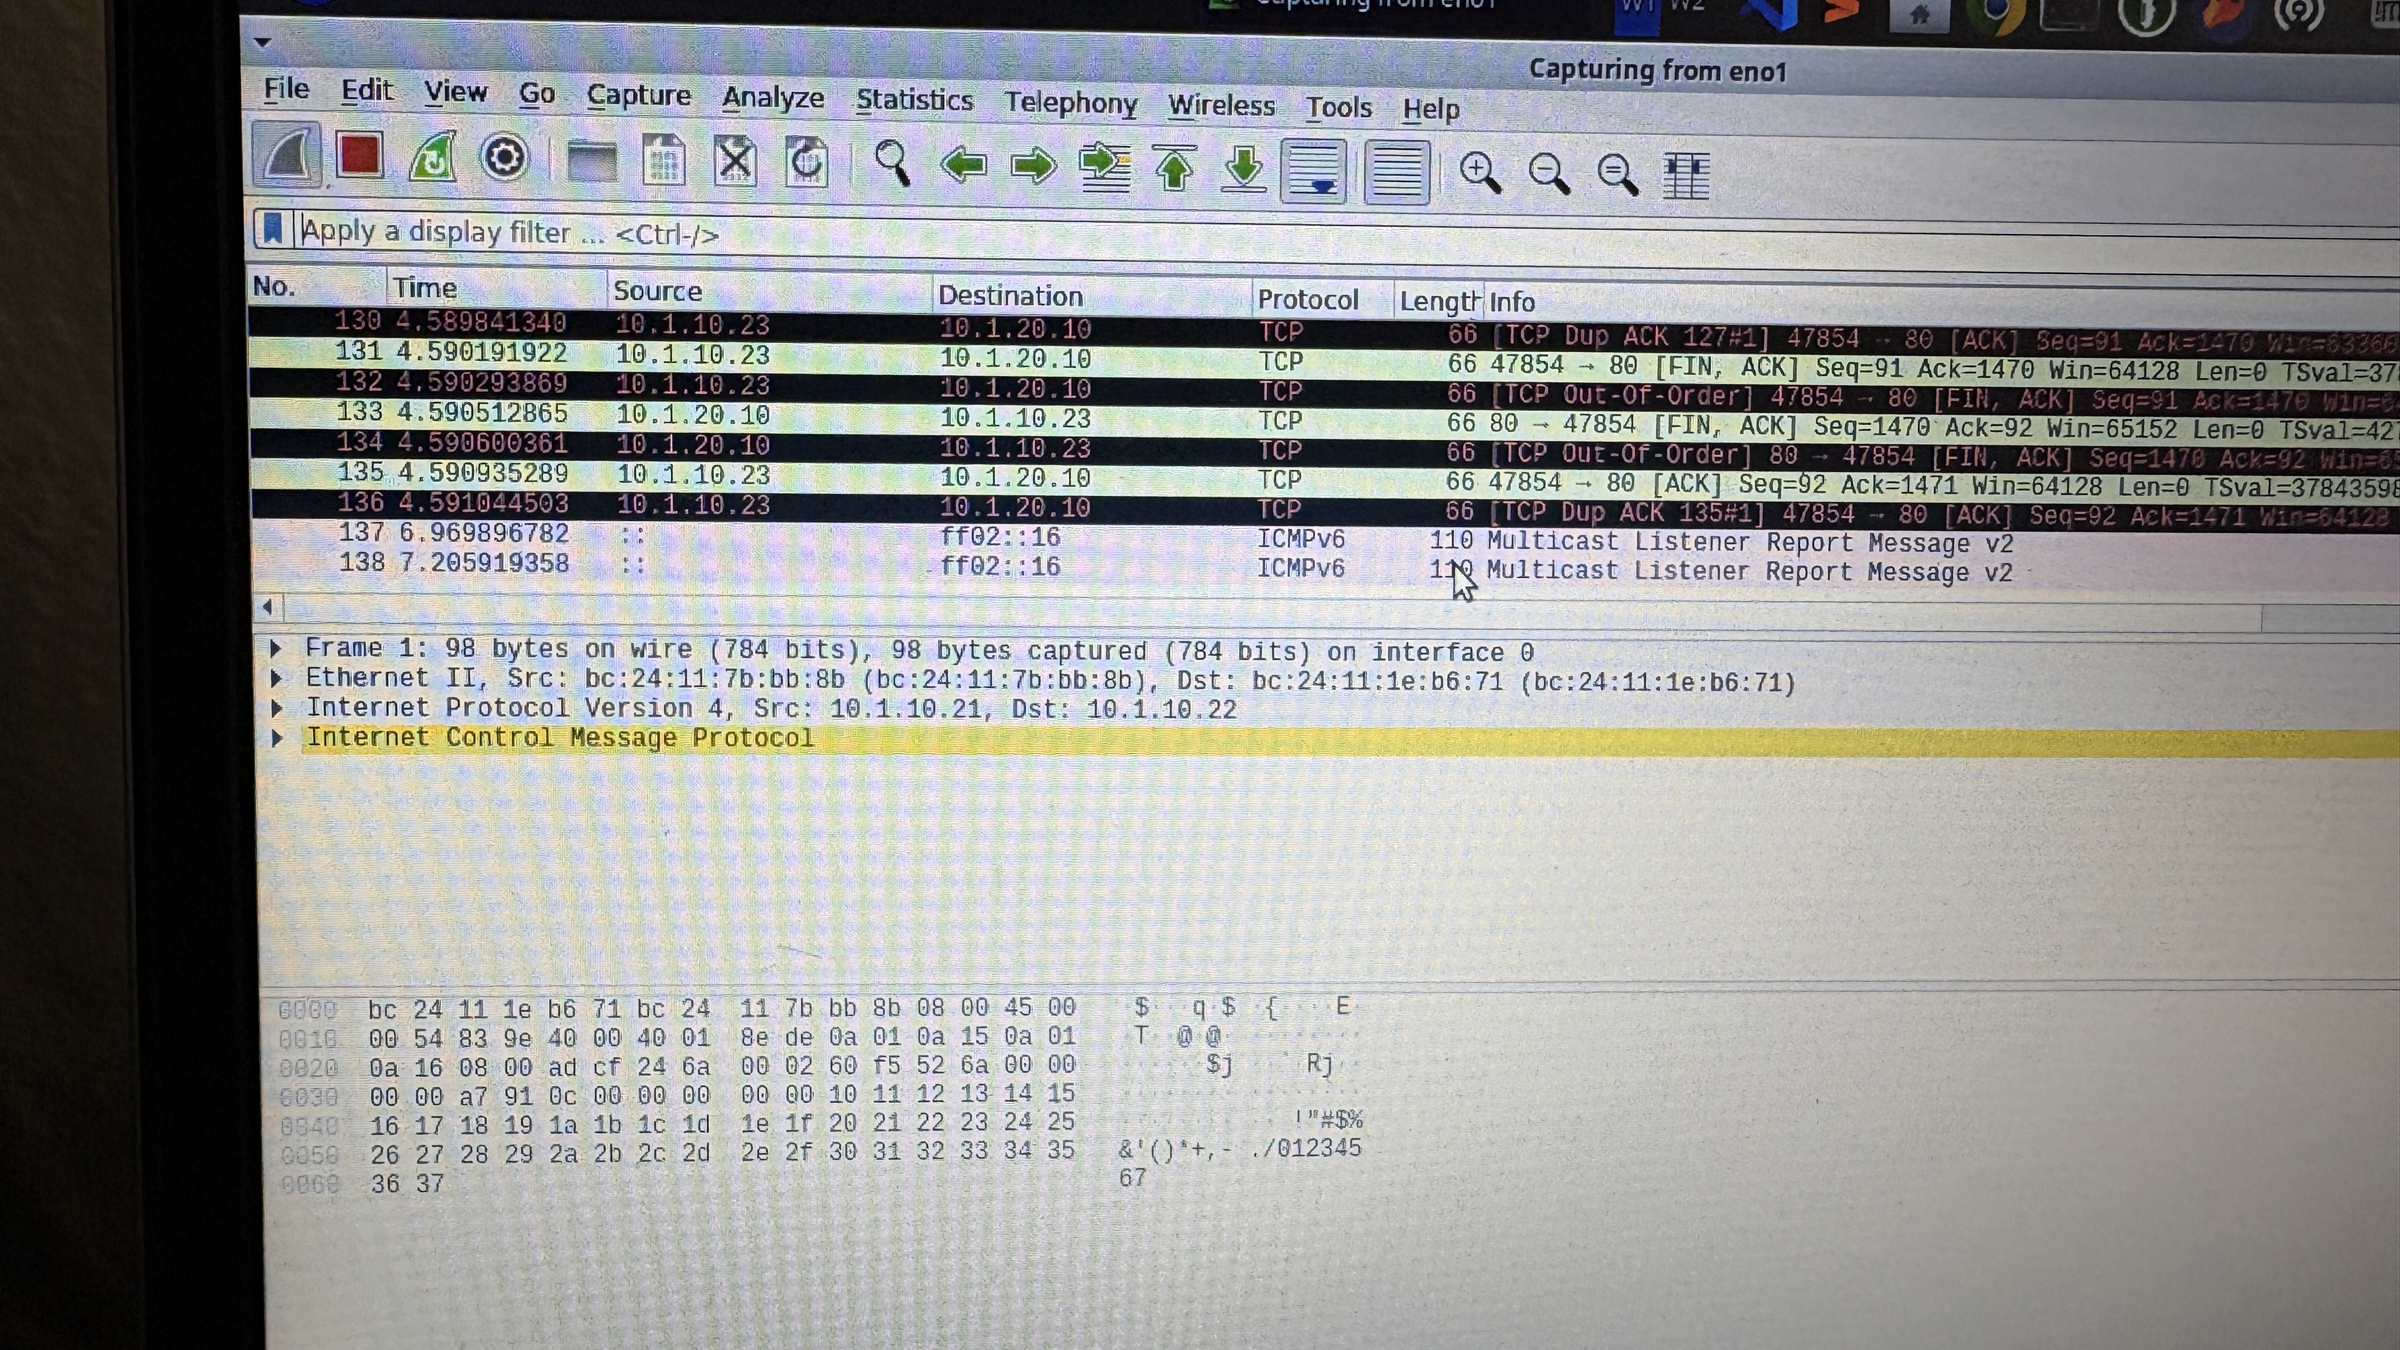
I then wanted to test the mirror NIC from outside the Ludus host, so I ran a cable from the Proxmox server to my utility laptop, started Wireshark, and captured the traffic:
After this test, I unplugged the laptop and ran the same cable from the Proxmox server to a spare port (eno3) on another Proxmox host running a capture VM.
I created a VM bridge, vmbr3, and added a second network device to the capture VM attached to that bridge:
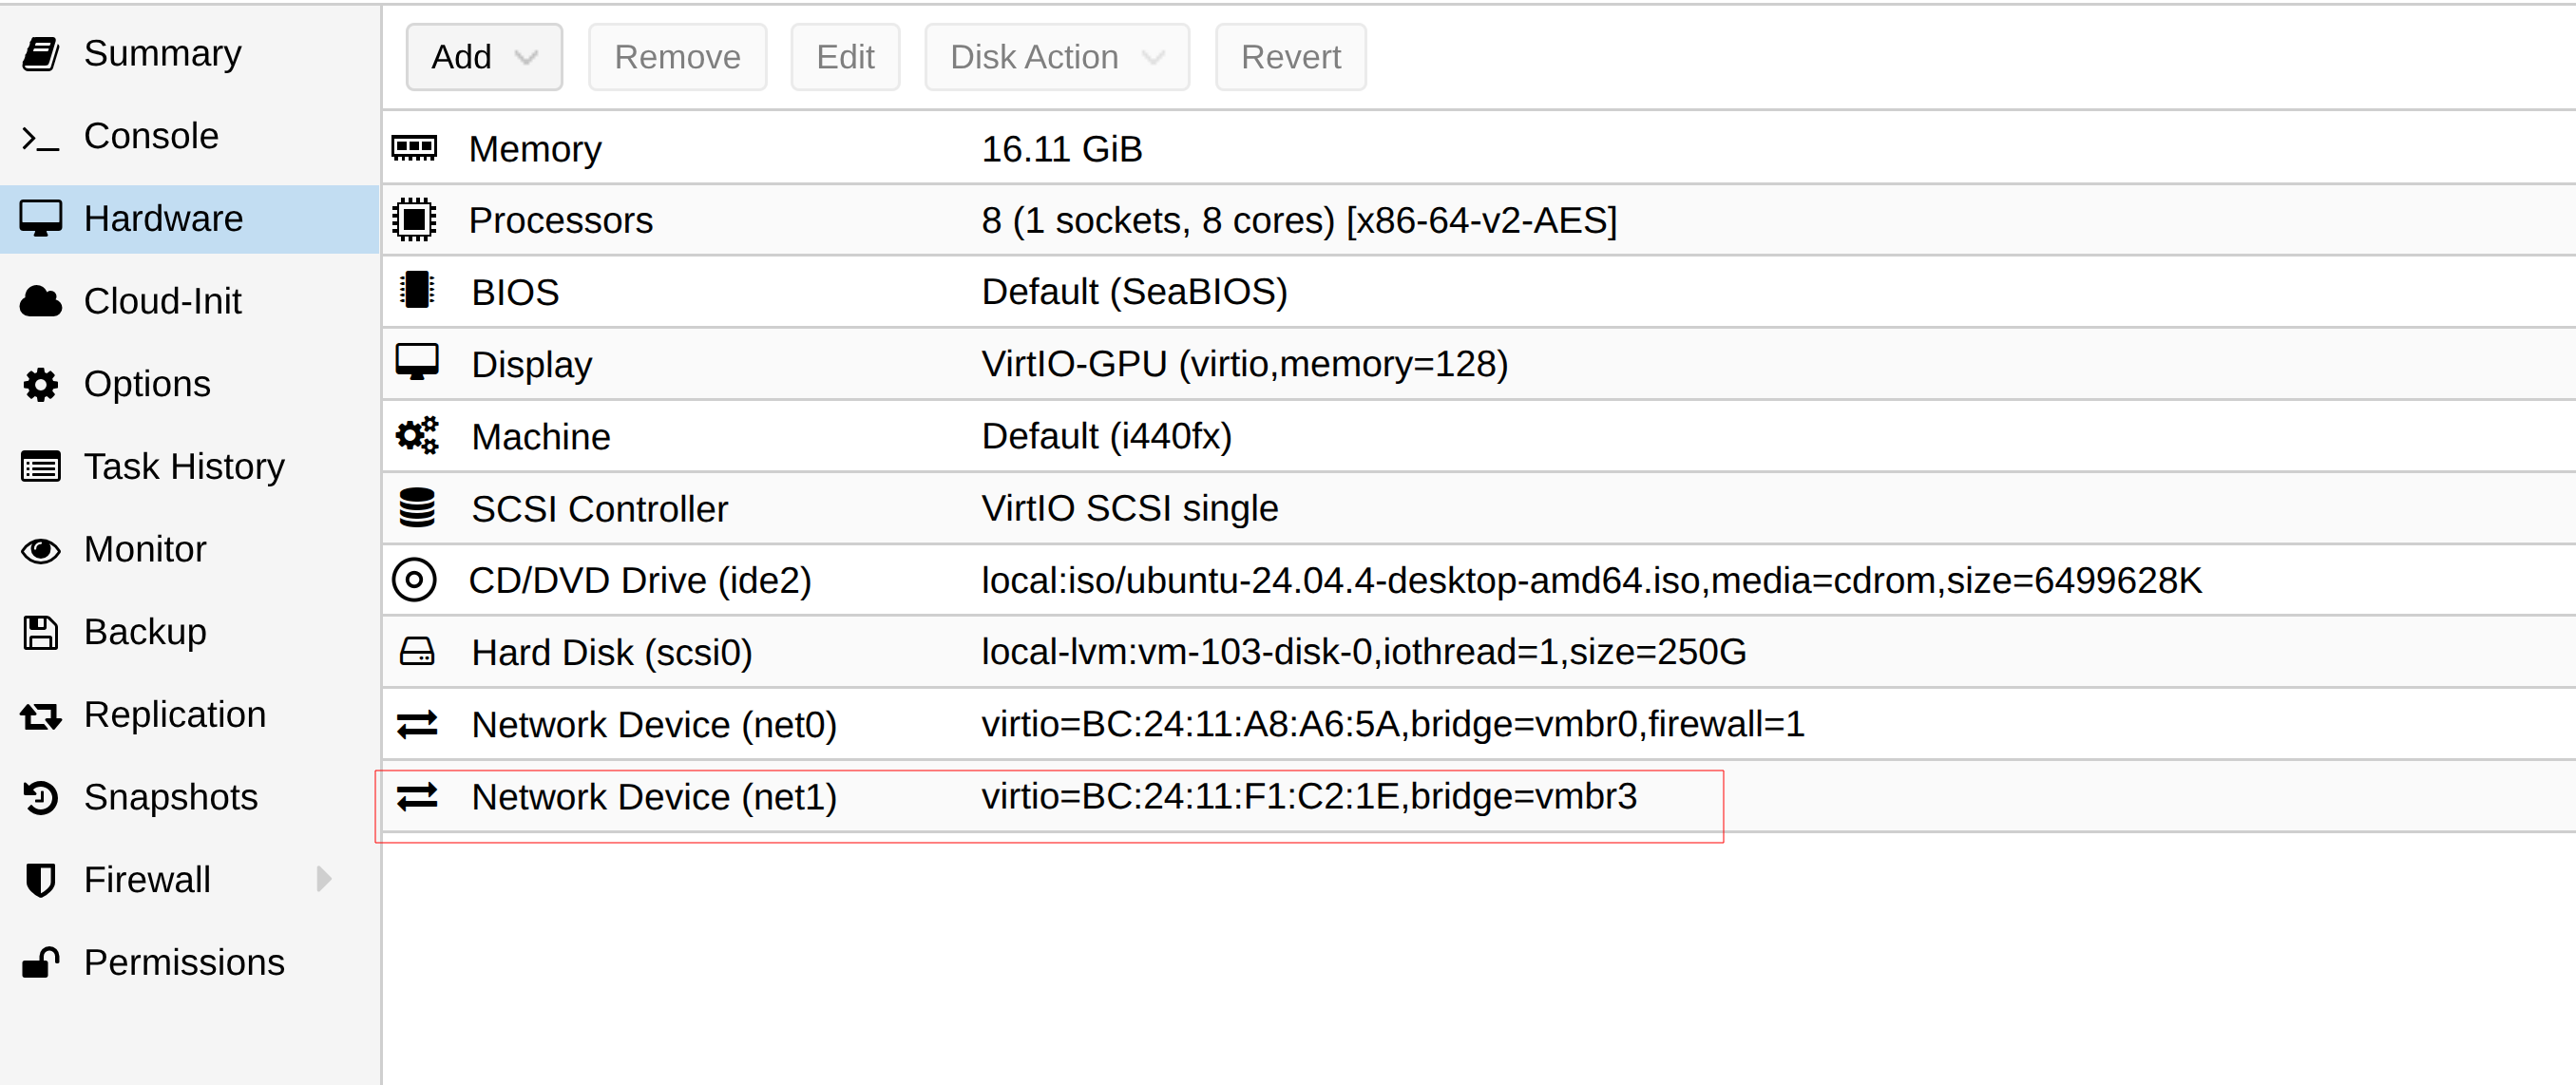
I then opened Wireshark on that VM and sniffed the interface.
At first I saw only traffic from the capture VM and its Proxmox host, and nothing from the range.
The cause was how the capturing Proxmox host’s bridge learns MAC addresses.
When you run tcpdump on the bridge master (vmbr3), you capture every frame that enters the bridge, regardless of where the bridge decides to forward it.
The forwarding decision is separate.
Every mirrored frame arrives on eno3 carrying a range VM’s source MAC, so the bridge learns all of those range MACs as living on the eno3 port.
When a reply frame arrives destined for one of those learned MACs, the bridge forwards it only toward eno3.
Because the frame also arrived on eno3, the bridge drops it, because a bridge never sends a frame back out the port it came in on, so it never floods to the capture VM’s tap.
The only frames that still reach the VM are broadcast and multicast, plus anything in the brief window before a MAC is learned, which matched the “local traffic only” symptom I was seeing.
The fix is to stop the bridge from learning on eno3 (see bridge(8)), so every range MAC stays unknown and is flooded to all ports, including the VM’s tap:
1
2
ip link set vmbr3 type bridge ageing_time 0
bridge link set dev eno3 learning off
I also added these settings to /etc/network/interfaces so they survive reboots, and applied them with ifreload -a.
After that, the capture VM saw the range traffic.
Pointing Wireshark at the same mirror shows the cross-VLAN traffic, including the 10.1.20.10 -> 10.1.10.10 traffic on 3306, where the web tier reaches into the database exactly as the firewall allows:
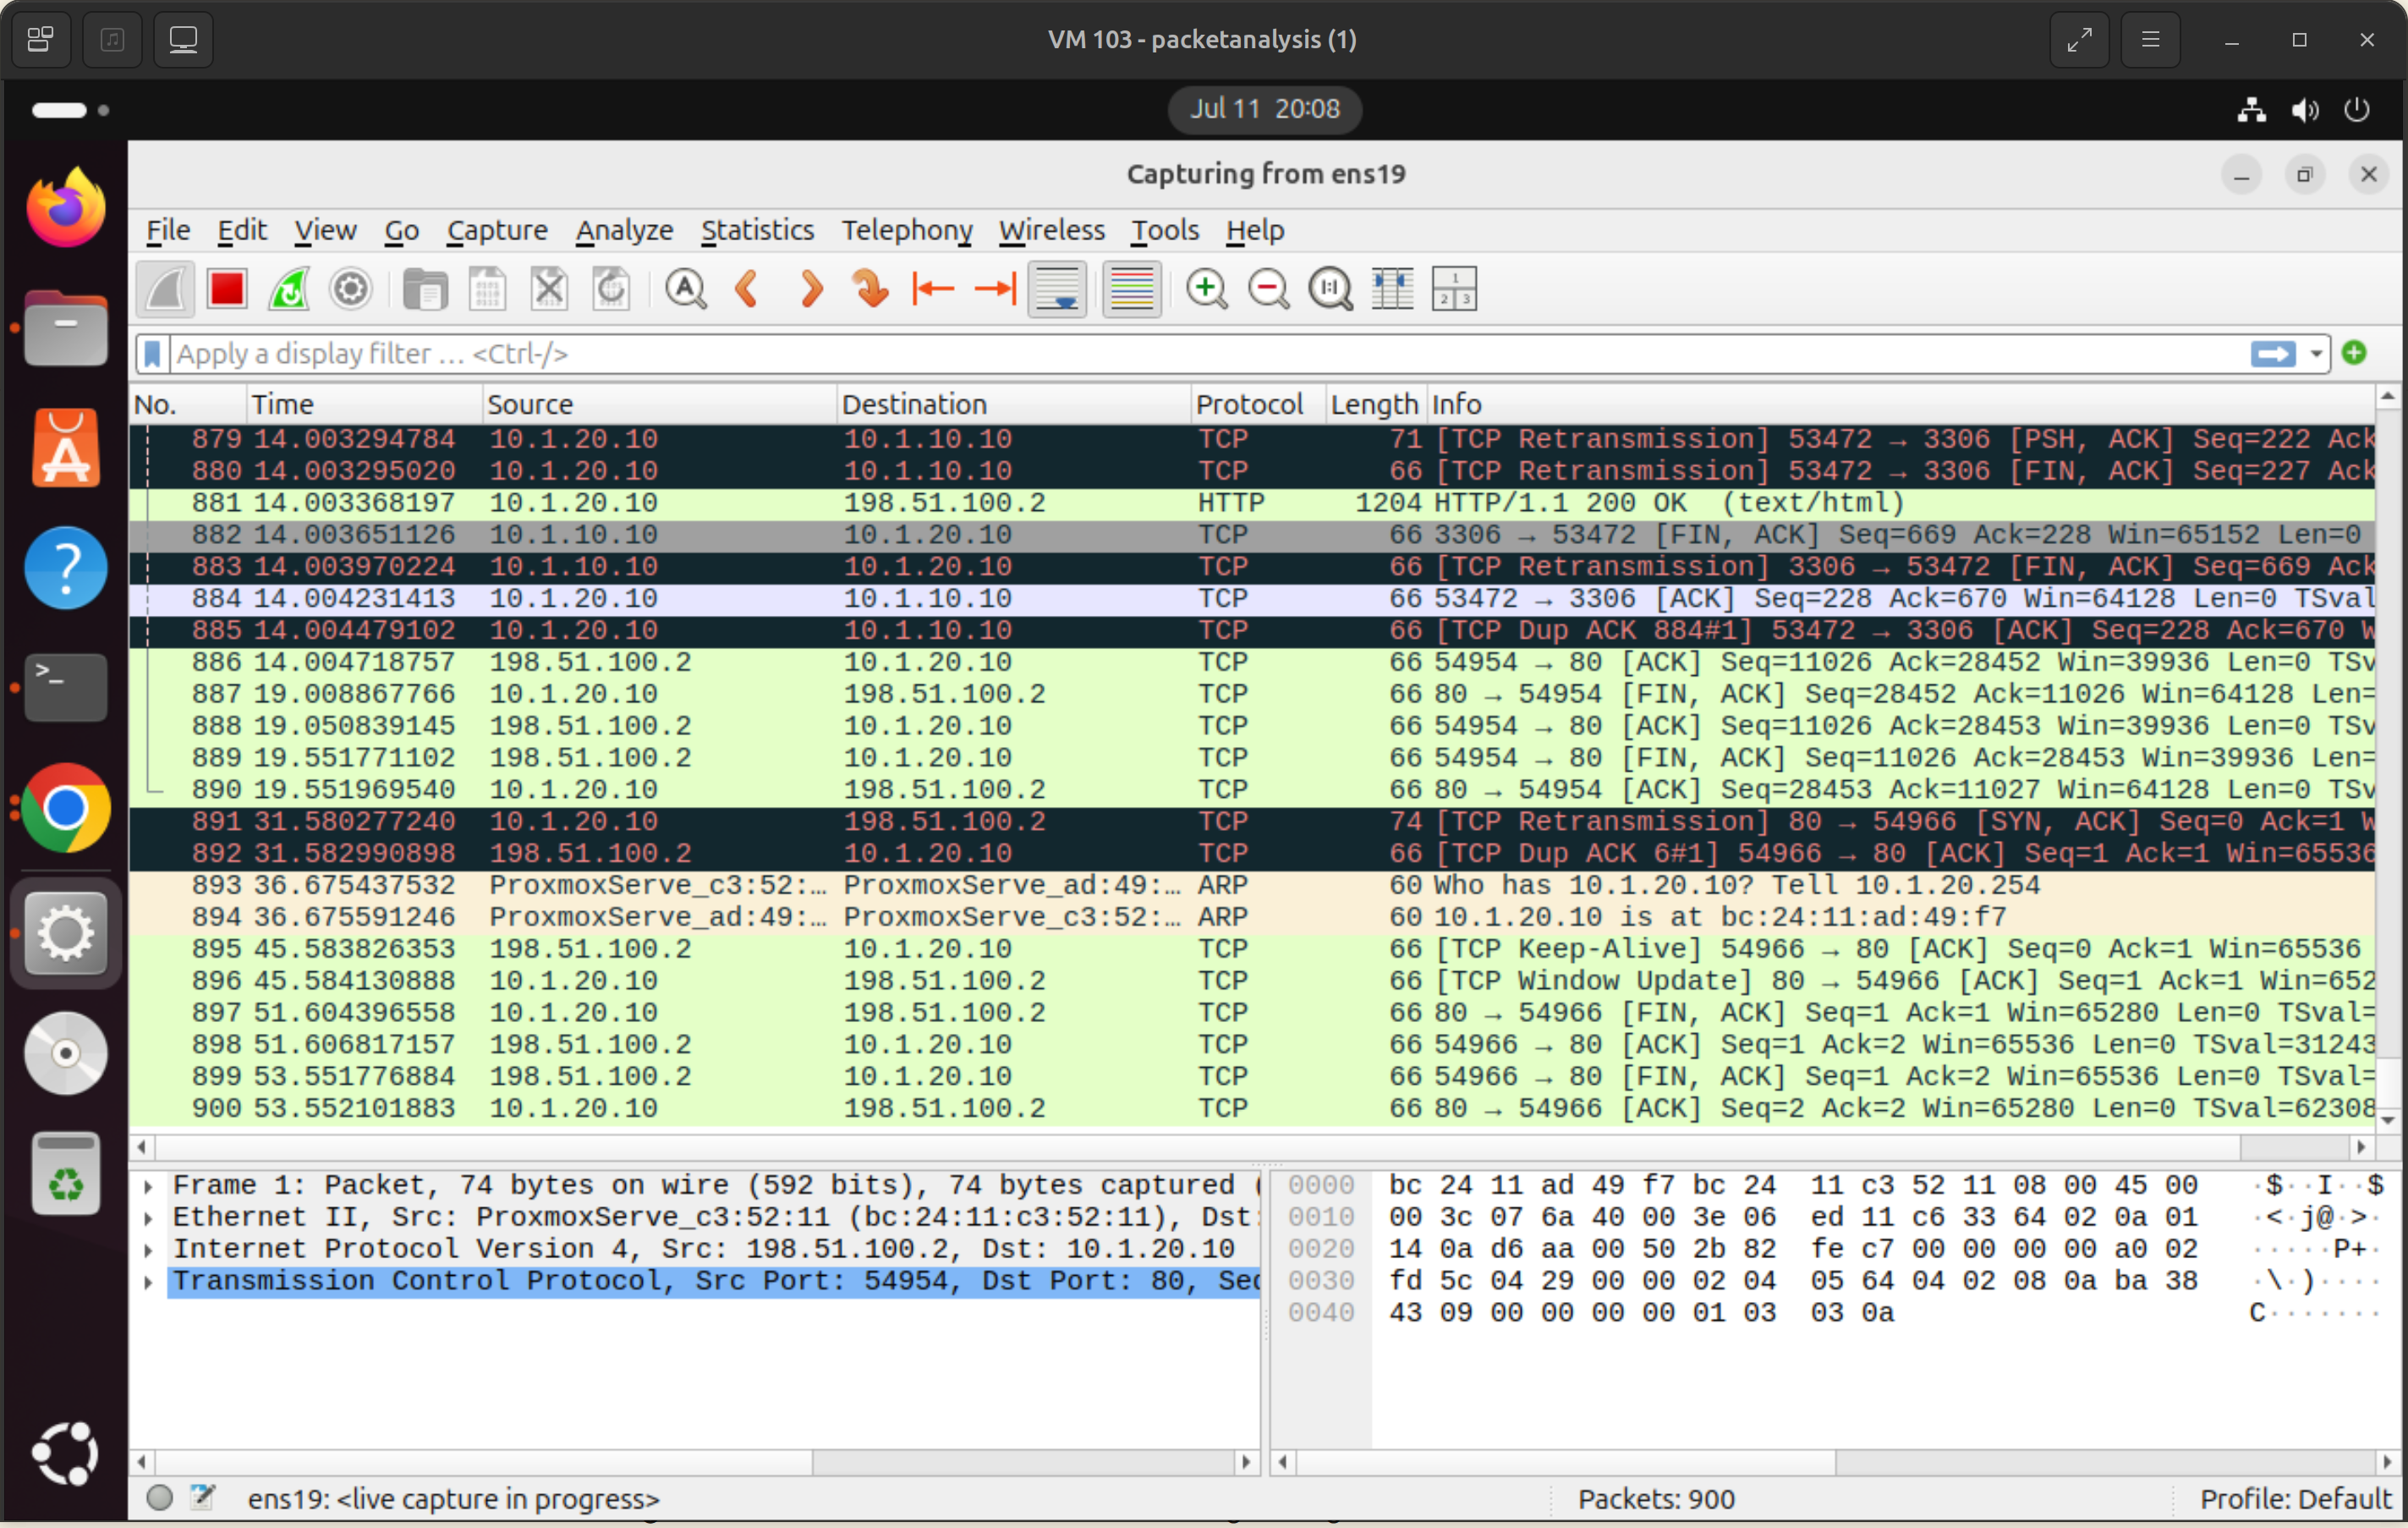
What I took from this entry is that the documented method and the one I wanted were not the same thing here. I only noticed because I stopped to ask what my measurement was doing to the thing I was measuring, and that is a question I want to keep asking on this range.
Entry 3 - Giving the capture something to look at
I tapped the range and started a capture, and it was almost silent. A segmented lab at rest produces very little: some ARP, a little background chatter, nothing that tells a story. If I’m going to study traffic, the range needs to do something.
The goal for this entry was continuous, varied, realistic activity that flows across exactly the paths I built (analyst to web to database) and keeps running, so a capture of any length has substance.
The shape of the traffic
The natural traffic source is already in the topology: the analyst workstations.
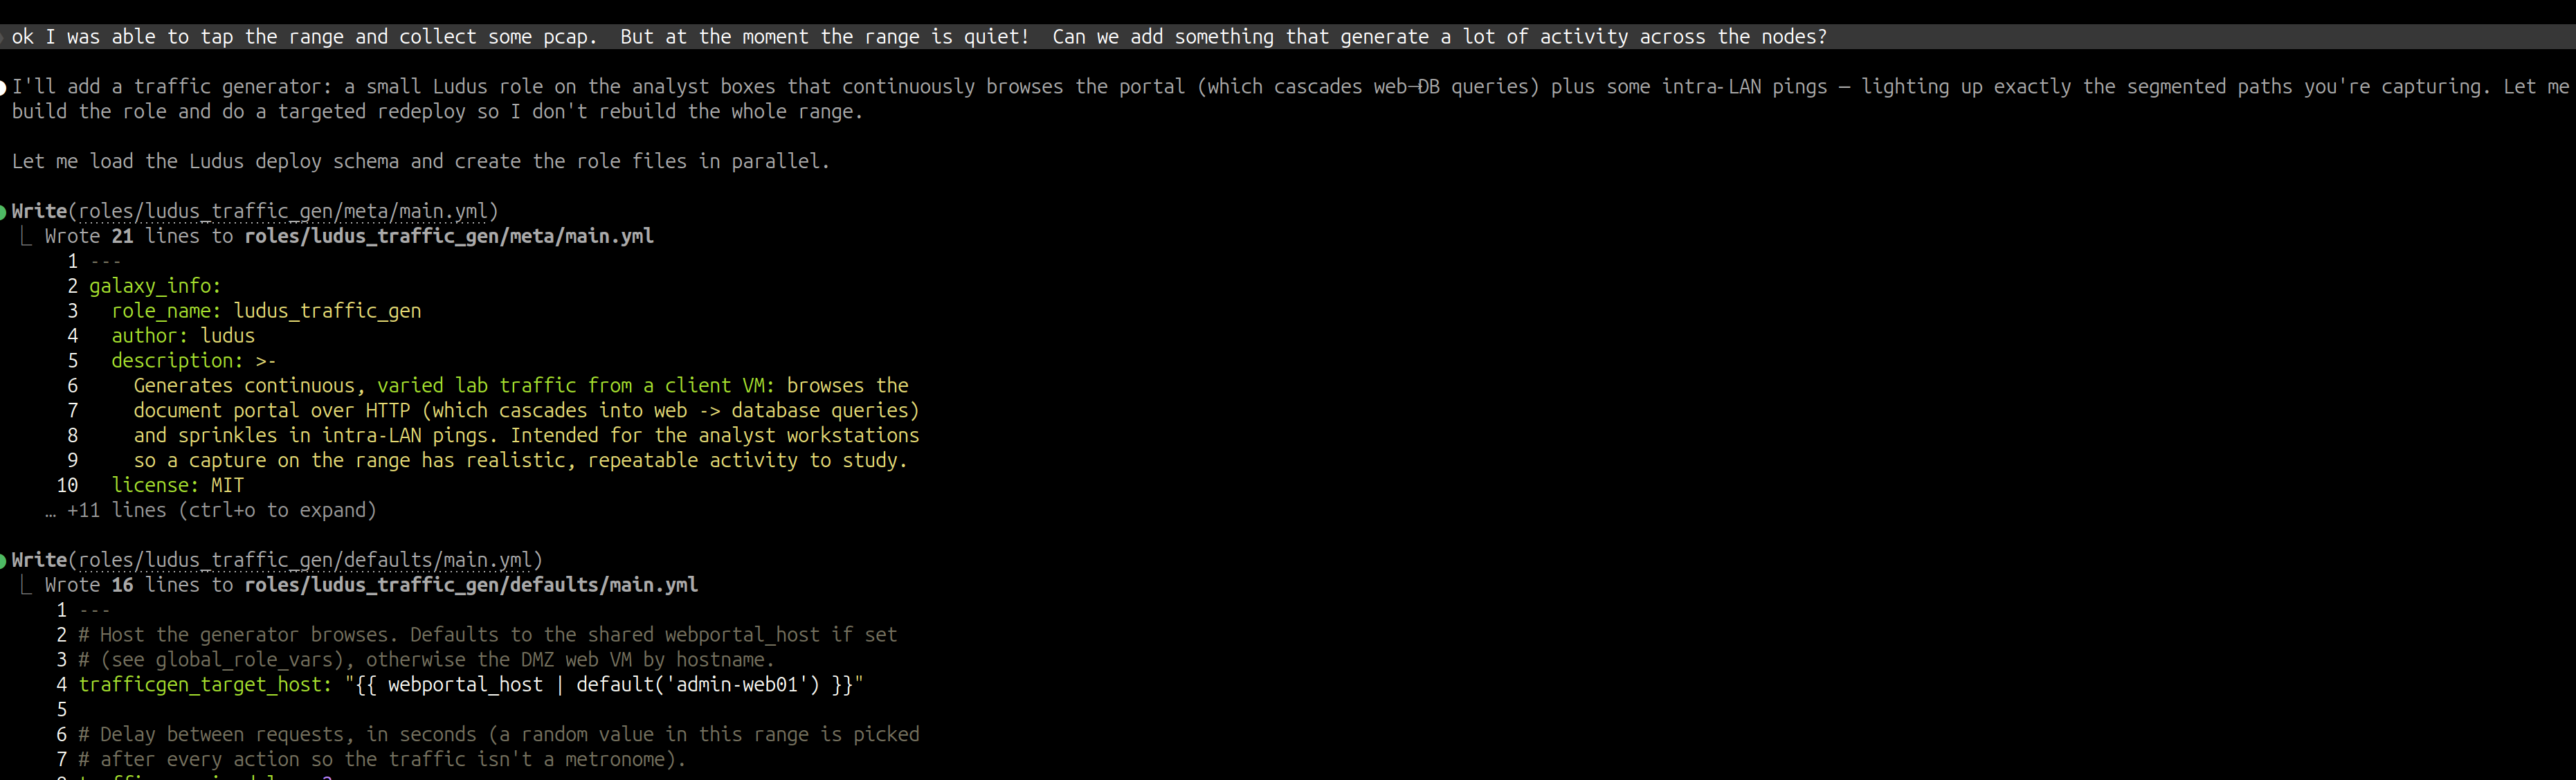
Real analysts browse the portal, so I had Claude write a small role, ludus_traffic_gen, that installs a systemd service on soc1/2/3.
Each box runs its own randomized loop:
- 60%: pull a random document (
/?id=N, with N ranging past the seeded set so some requests intentionally hit the “no such document” path) - 30%: load the full index page
- 10%: ping a random LAN peer (the database or another analyst)
- a random 2-9 second pause between actions, per host, so the timing is never regular
The whole role came from a single sentence, “add something that generates a lot of activity across the nodes,” with Claude writing the meta, defaults, tasks, and templates in one pass:
The useful property is the cascade.
Every HTTP request to the portal makes the DMZ web tier open a 3306 connection to the database on the LAN.
One simple client behavior exercises both permitted cross-VLAN flows at once, and three boxes looping independently produce overlapping traffic that rarely repeats.
The service is enabled with Restart=always, so it survives reboots and keeps running.
Shipping it without rebuilding the range
I didn’t want to tear down six working VMs to add a service to three of them.
Ludus’s deploy accepts only_roles and limit, so the update could be targeted:
1
2
only_roles: [ludus_traffic_gen]
limit:      localhost,admin-soc1,admin-soc2,admin-soc3
Package the role, push it, push the updated config, and deploy. The whole run:
1
2
20:09:20  DEPLOYING
20:10:29  SUCCESS
It took about a minute, and only the analyst boxes were touched; web01 and the database were unaffected. The deploy’s last step is “enable and start the generator,” so a successful run confirms that traffic is flowing.
Driving and observing it
The generator is a normal systemd service, so it’s easy to control:
1
2
3
journalctl -u range-traffic-gen -f     # watch requests as they fire
systemctl stop range-traffic-gen       # go quiet (e.g. to capture a clean baseline)
systemctl start range-traffic-gen      # resume the traffic
The tap now has a steady stream to work with. Importantly, it is the right traffic: it only exercises the flows the firewall permits, so the capture reflects the segmented design.
Loading the capture into Teleseer as a graph makes the design clear at a glance.
The two /24s sit in separate zones, the analyst boxes and database cluster in the LAN, and web01 stands alone in the DMZ.
The only flows crossing between VLANs are the two sanctioned ones, 10.1.10.22 -> 10.1.20.10 on 80/http and 10.1.20.10 -> 10.1.10.10 on 3306/mysql.
The rest of the list is each host’s DNS lookups to its own gateway (.254), which stay inside the VLAN:
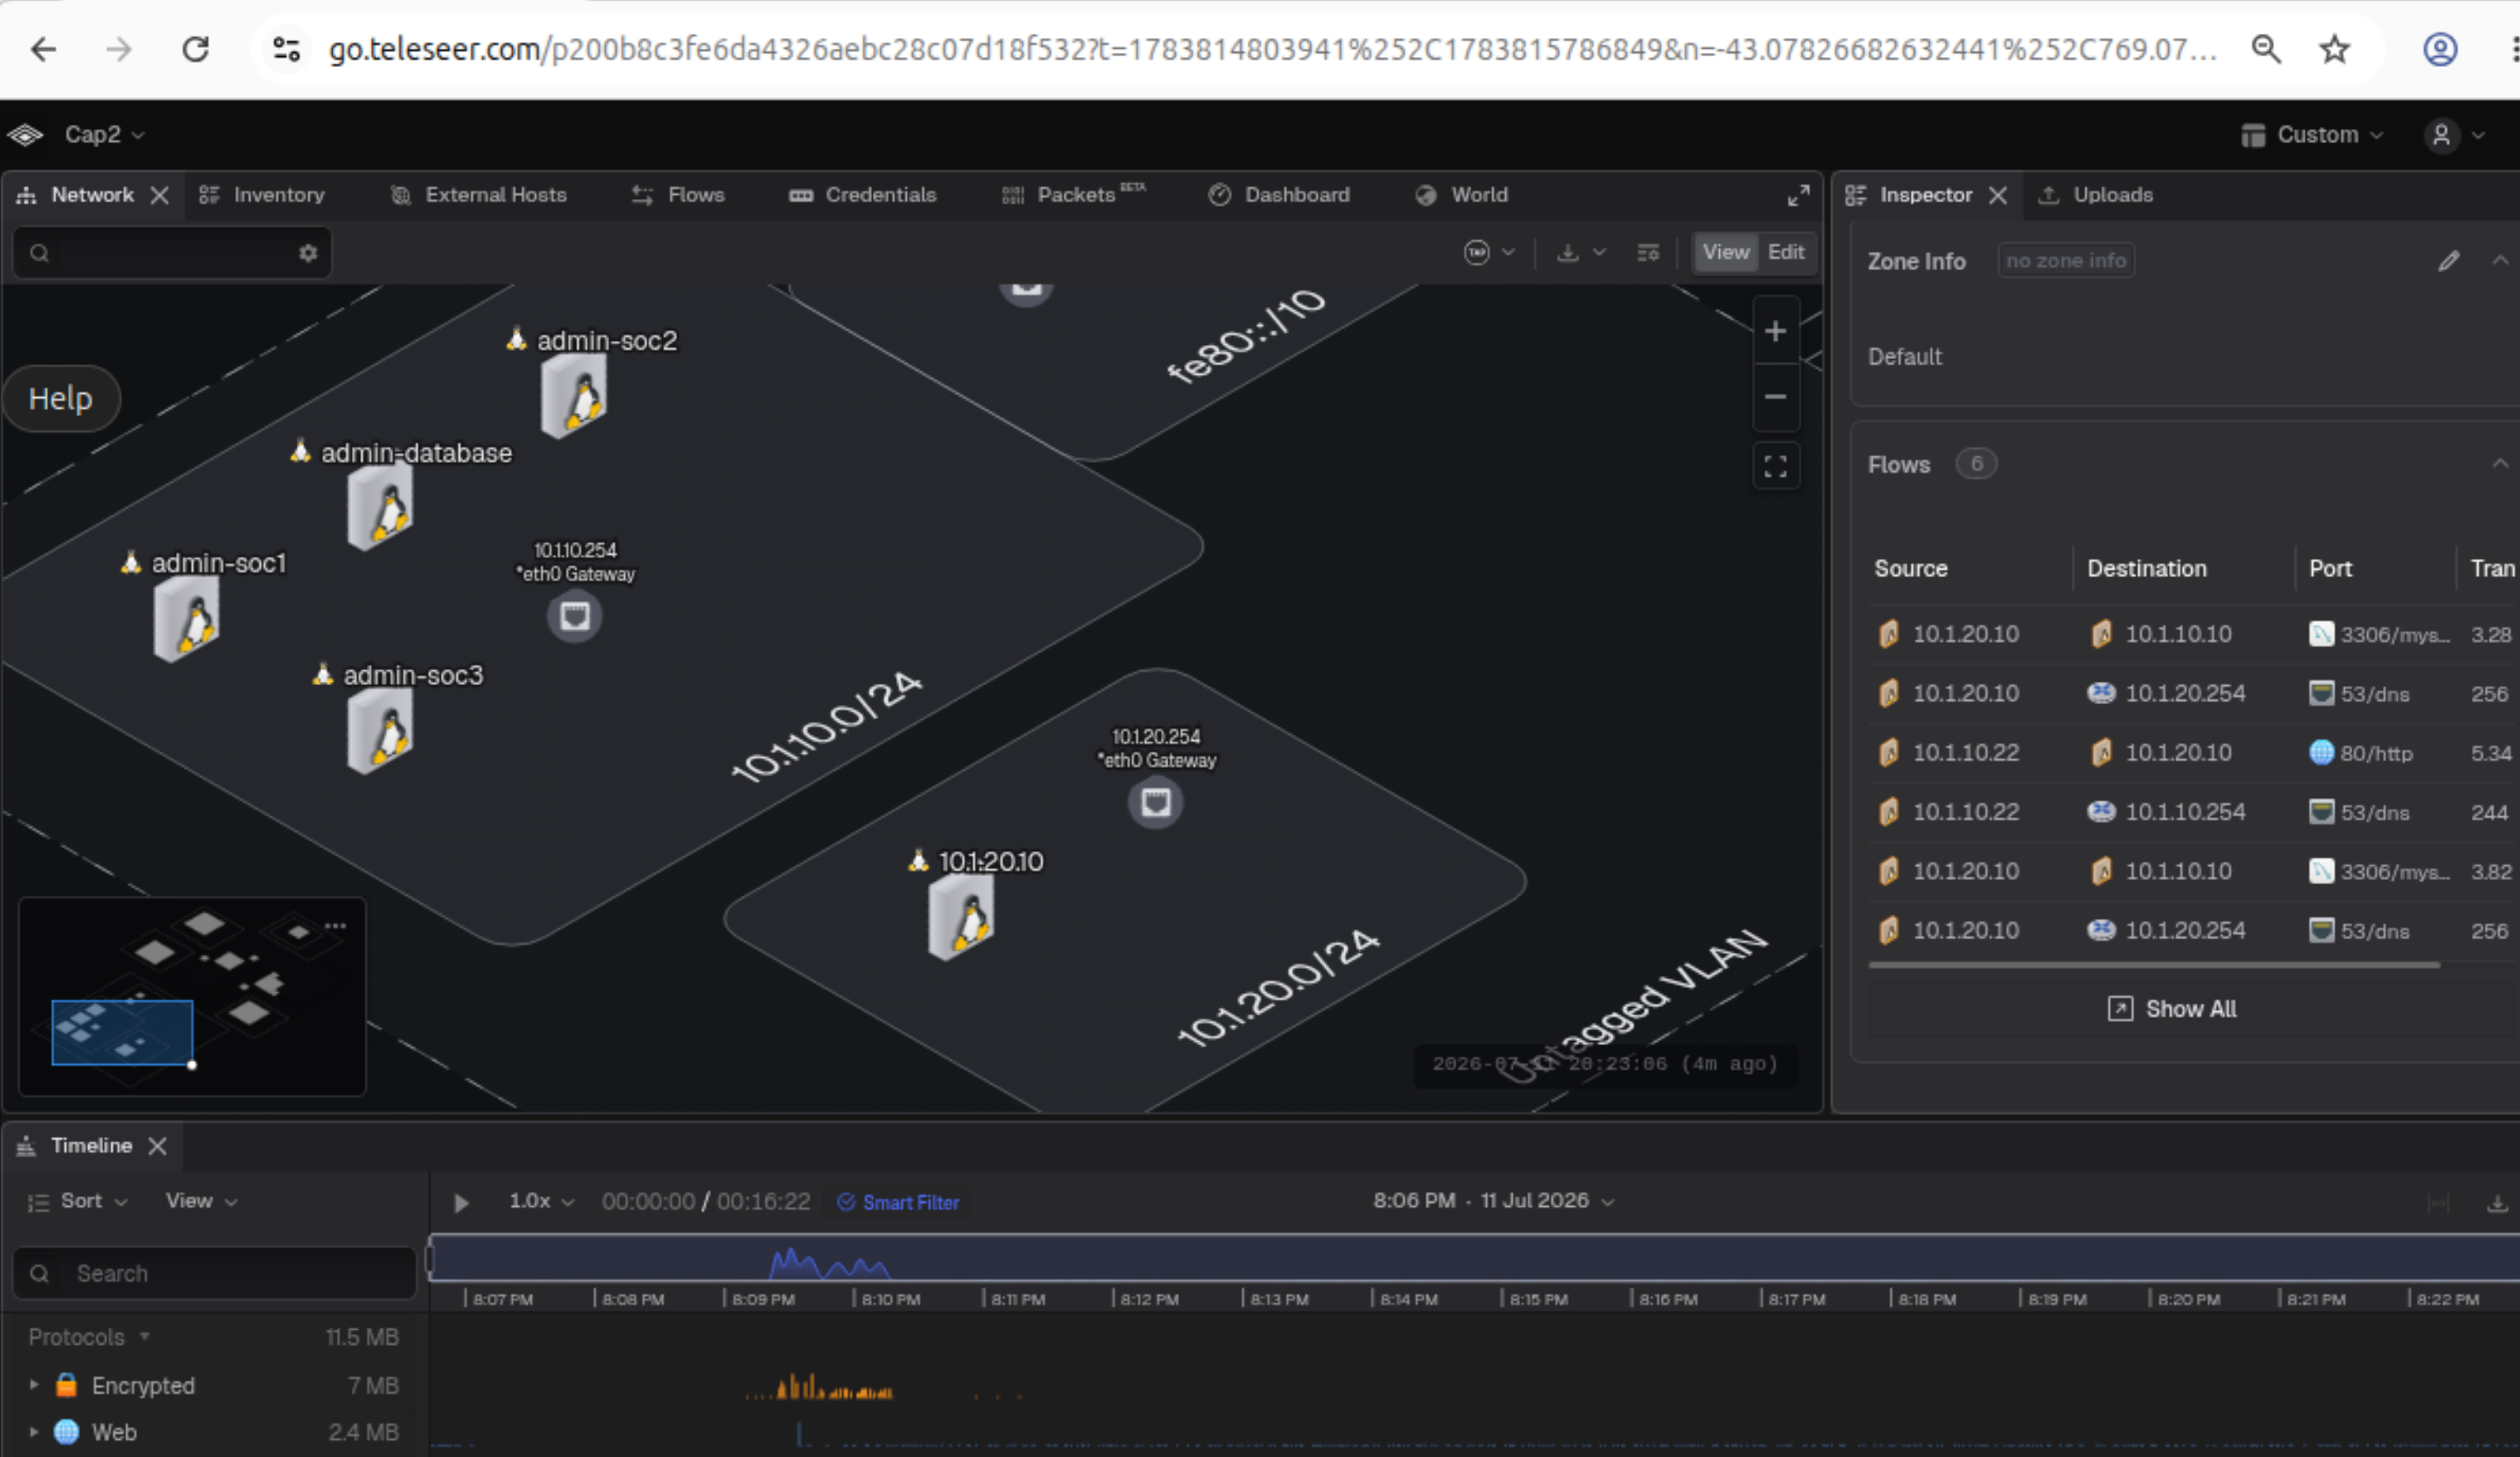
Keep in mind what this picture can and can’t show. The generator only sends allowed traffic, so seeing no blocked flows doesn’t prove the firewall works; the negative tests in Entry 1 do that. What the capture shows is that the steady-state traffic follows the design.
That picture summarizes the project so far: a range described in a sentence, provisioned by Claude, segmented on purpose, and now generating traffic that follows the segmented design. The next step is giving the range somewhere to send its own telemetry, and someone to watch it.
Coming in Part 2
The range now builds itself from a description, has segmentation that’s been tested in both directions, and produces traffic worth looking at. What it does not have yet is anywhere for that activity to land, or anyone watching it.
Part 2 adds a Wazuh SIEM on its own SOC VLAN, with agents reporting across the VLAN boundaries through exactly the rules opened for them. It also covers the review pass at the end: the hard-coded assumptions it turned up, a version pin that left the agents a release ahead of their manager, a check that ran before the role that would have corrected them, and adding direct SSH access to the VMs.
References
Ludus
- Ludus and its documentation
- Installing Ludus
- Using the Ludus CLI locally, including WireGuard
- Ludus networking, including packet capture
- Ludus roles and snapshots
- Ludus MCP documentation and the
@badsectorlabs/ludus-mcppackage - Ludus skills and Ludus source
Claude and agent tooling
- Claude Code
- Connecting Claude Code to MCP servers
- Claude Code permissions
- Claude Code skills and the
skillsCLI - Model Context Protocol
Infrastructure
Range applications
- Apache HTTP Server, PHP, MariaDB
- Wazuh (Part 2)
Packet capture and analysis